It is very hard to list all the cameras that do work with cam2pc. A list built from the users' experience is being automatically maintained here. Keep in mind that this list is filled by cam2pc users and therefore does not represent a guarantee that cam2pc does effectively work with the cameras listed here.
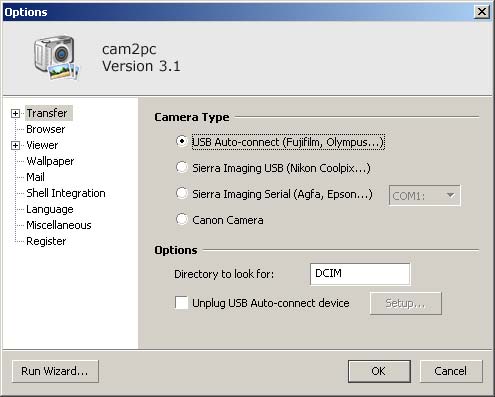
Before cam2pc can download pictures from your camera you must setup your camera type. The default is to support cameras that appear as removable drives which are assigned a letter (e.g. F:\) in Explorer. If you successfully ran the Configuration Wizard then your camera type should have been automatically detected and been setup properly.
For the USB Auto-connect type of cameras, automatic plug-in detection is supported: as soon as you plug your camera, cam2pc will display the Download dialog (if cam2pc is already running). To differentiate your camera from other removable devices, cam2pc will look for a particular folder on the device. The default value (DCIM) should work for all the standard cameras but you can always change this value in the Camera tab of the Options dialog. For this type of camera you can also automatically unplug it at the end of the file transfer. Check the "Unplug USB..." option and click the Setup button next to it. Make sure your camera is plugged in and switched on while doing this. A window with the list of removable USB device appears. Select the one that matches your camera (my Olympus camera appears as "USB Mass Storage Device @ C-200Z/D-510Z" while a friend's Fujifilm appears as "USB Mass Storage Device @ USB Mass Storage Device") and press OK.
Since version 2.0, cam2pc supports camera based on the Sierra Imaging chipset. This includes:
If your camera uses a serial connection, you will also have to specify the COM port to which your camera is connected.
For these cameras, there is no automatic detection. Once you have plugged your camera you will have to run the downloader manually (by right-clicking the cam2pc tray icon).
The software has been tested with a Nikon Coolpix 990. NikonView was not installed but the USB drivers (found at the root of NikonView program) were installed. NikonView will run into conflict with cam2pc so you will probably have to uninstall NikonView and reboot your computer before using cam2pc to download images from your Coolpix camera. Again I have not tested that extensively so if you do not know what you are doing then follow these recommendations.
Since version 3.0, cam2pc support the following Canon cameras:
Version 3.1 added support for the following Canon cameras:
To activate the Canon options you must first download an additional components on cam2pc website. Please check the download section of cam2pc on nabocorp website. Once you have downloaded installed the Canon camera support component the Canon option should be enabled.
You can have cam2pc to be automatically launched when you plug your camera in. Go to Start > Setting > Control Panel. Then go to the "Scanners and Cameras" panel. Select your camera and click the properties panel. Go to the Events tab and select the "Camera is detected event". cam2pc should be listed here: select it if this is not the case. If cam2pc is the only application selected then it will be run automatically the next time you plug your camera in. If several applications are selected then a small dialog asking you to choose between the different applications will appear on camera connection (although there seems to be a bug on some systems: if the dialog does pops up and does not contain any application then you'll have to select only one application in the Control Panel. This is NOT a cam2pc bug).